
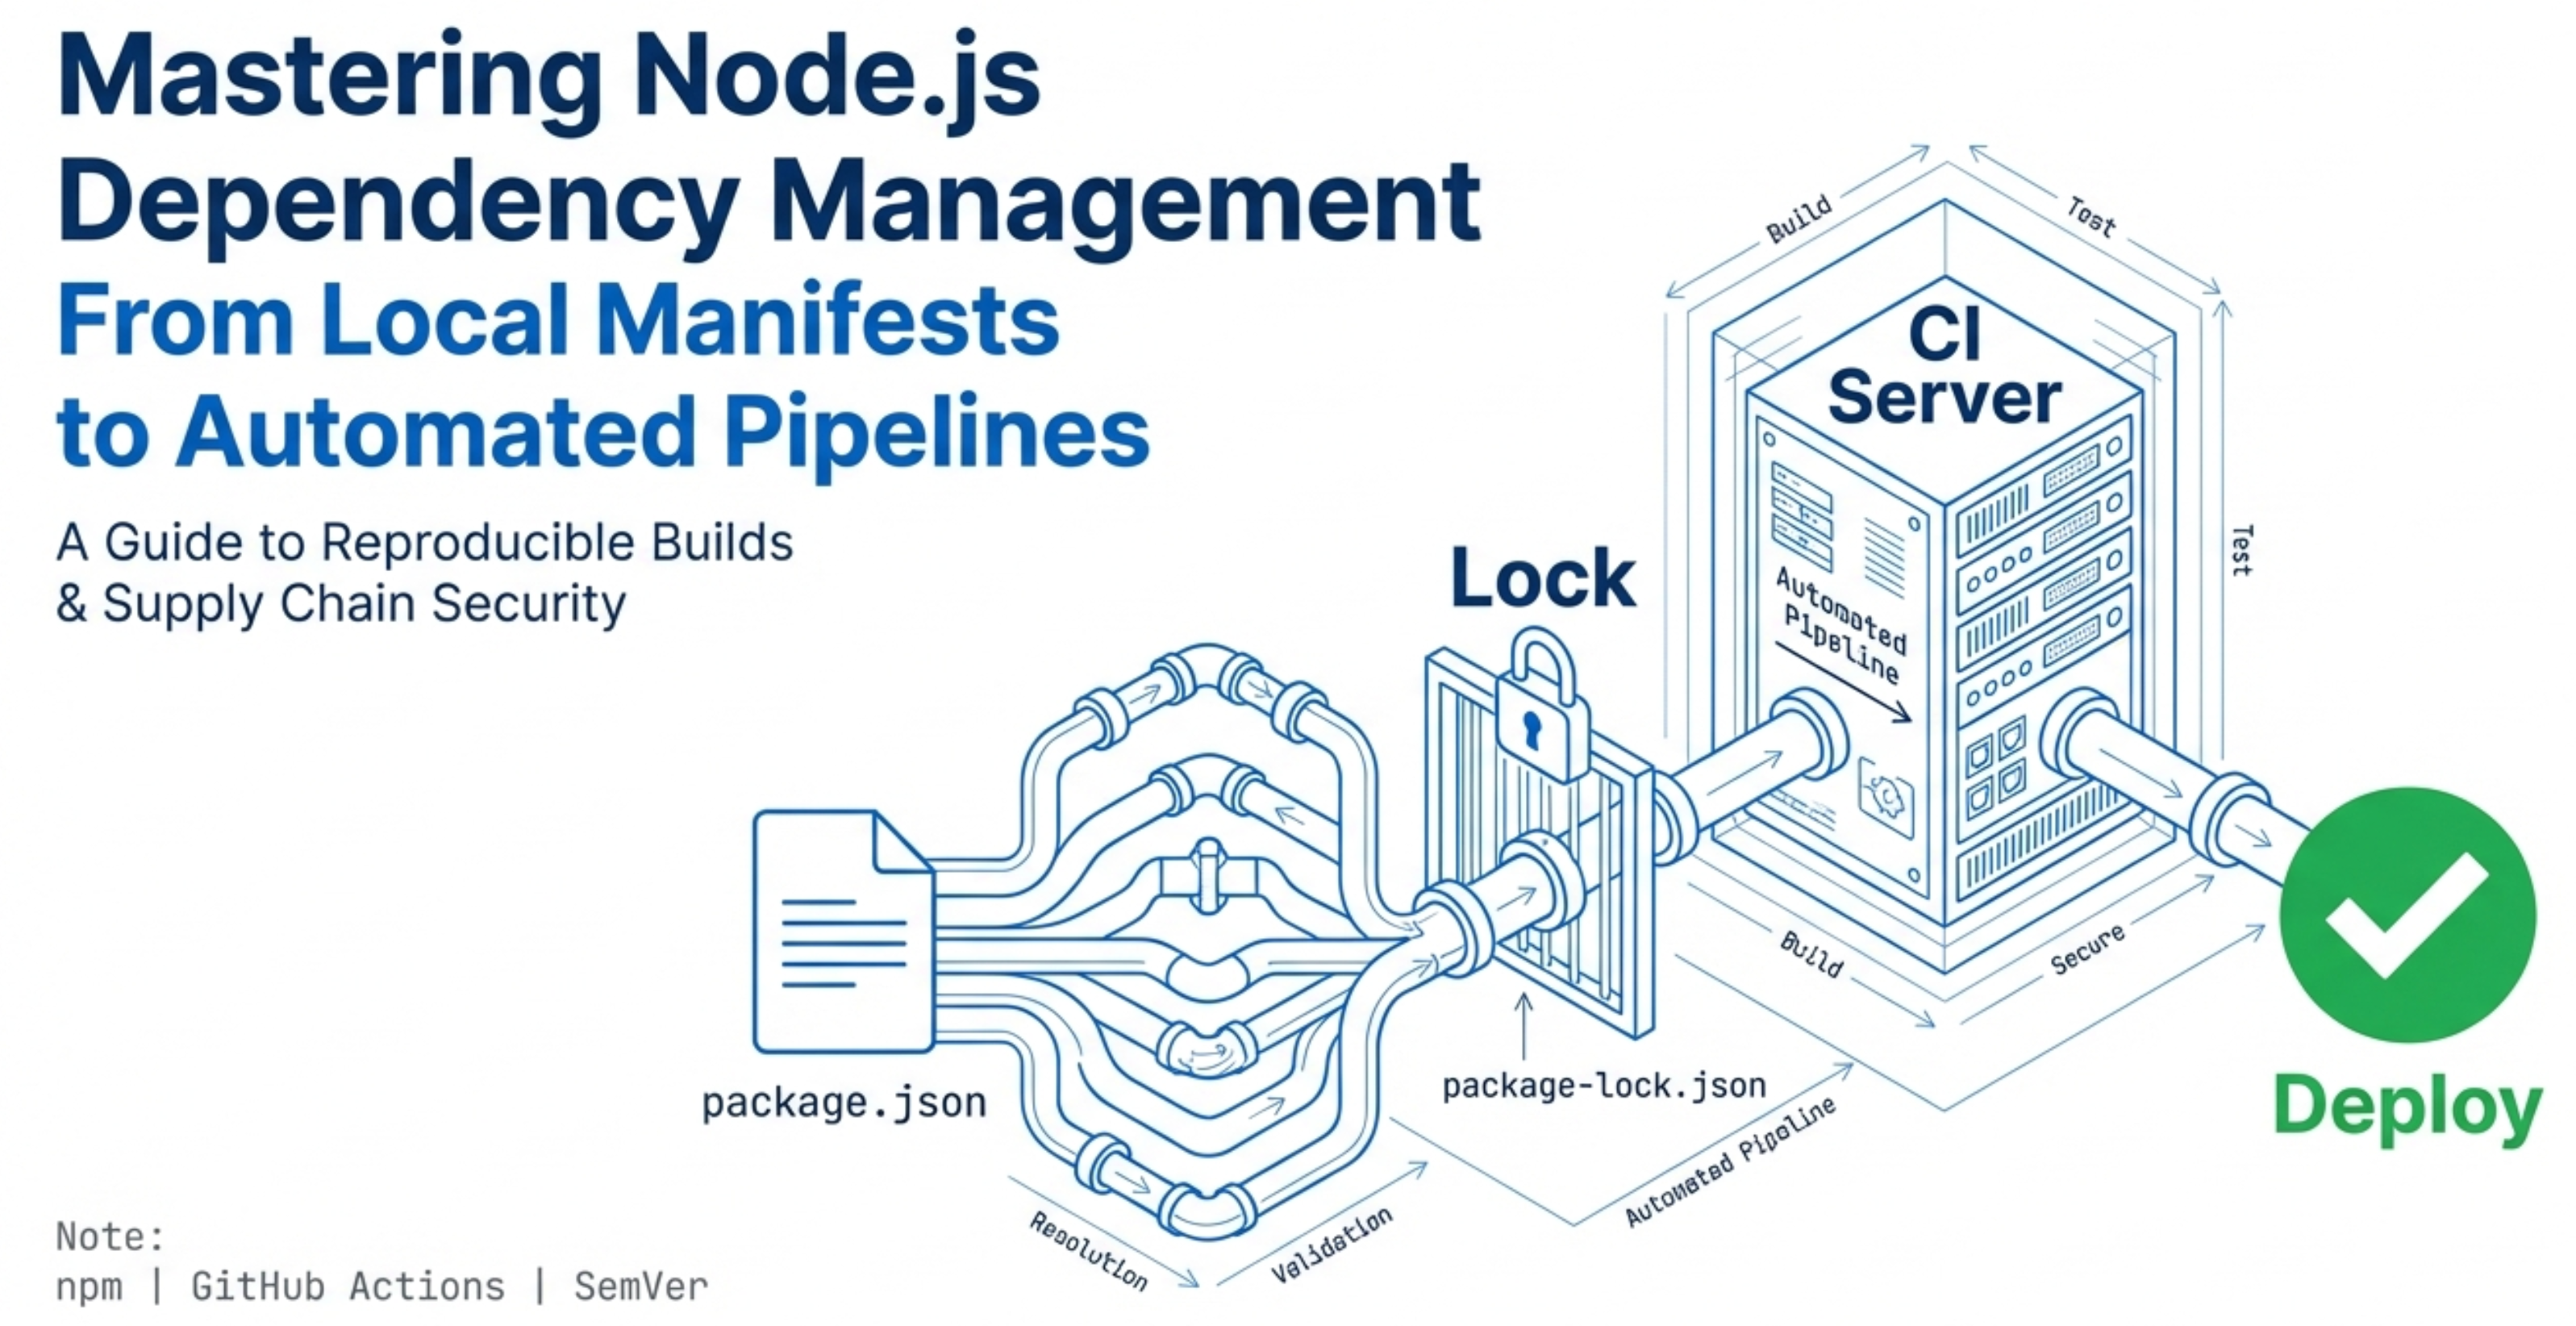
When you are building on any JavaScript application (for example Node.js or ReactJS), you quickly discover two files package.json and package-lock.json. These two files are very important and form the backbone of dependency management in your project to ensure your project runs smoothly whether you’re developing locally or deploying to a server.
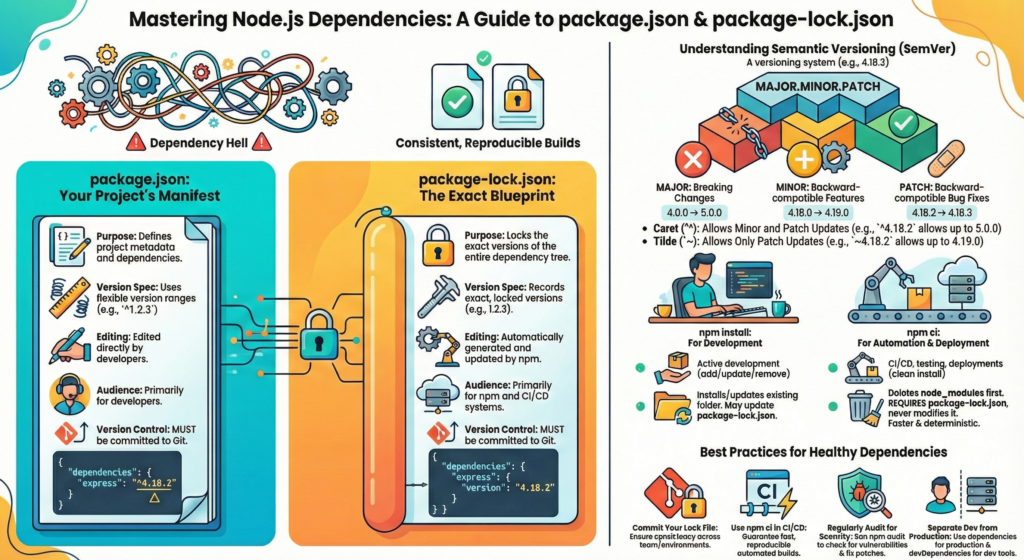
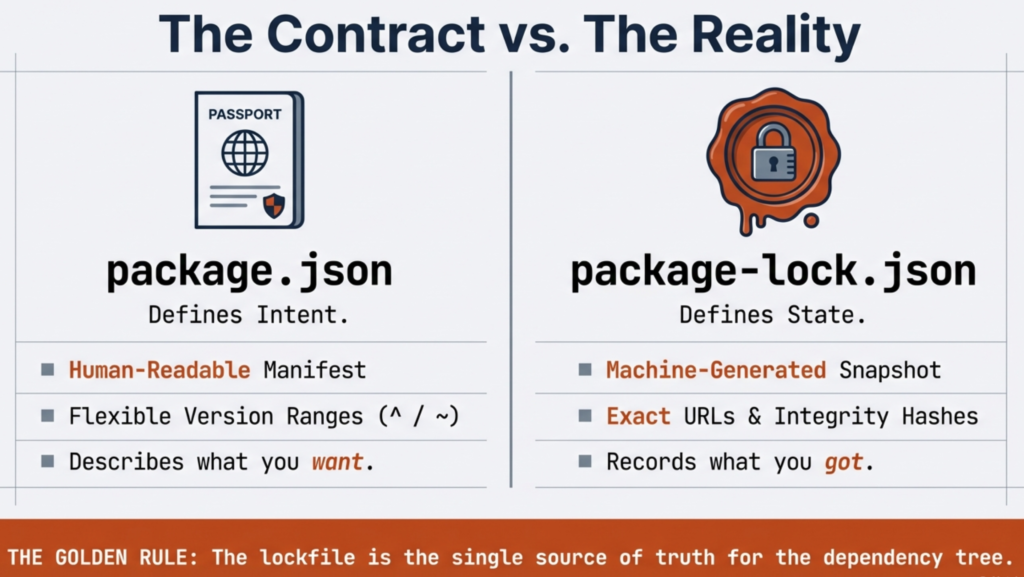
Think of package.json as your project’s identity. This file contains essential information about your application, like its name, version, description, and most importantly, the list of dependencies that your project needs to function.
And, package-lock.json acts as a lock(as the name suggests)—it locks down the exact versions of all your dependencies to ensure everyone working on your project on their individual machines use precisely the same versions.
These two files ensure consistency across your entire team and deployment pipeline.
Understanding the Manifest File
The package.json file is the manifest file of your Node.js project. It’s a simple JSON file that sits in the root directory of your project and contains metadata about your application along with a list of dependencies your project requires to function.
Every Node.js project should have a package.json file. When you initialize a new Node.js project, npm (Node Package Manager) helps you create this file with basic information like your project name, version number, and a description of what your project does.
Key Fields in package.json
Here are the most important and primary fields that you will see in a typical package.json file:
- Name: The name of your project. (This field is required if you plan to publish your package to npm.)
- Version: The current version of your project (e.g.,
1.0.0). - Description: A brief explanation of what your project does, helping others understand its purpose. This is usually optional.
- Main: The entry point of your application. This file is the primary file that executes first when you need to run your project or if it’s a package it is loaded when someone imports your package using
require()orimport. - Scripts: Custom commands you can run with
npmor any other package manager likeyarnorpnpm. These might includestartto run your app,testto run tests, orbuildto prepare your project for production. - Dependencies: Packages your application needs to run. These are installed in production environment.
- DevDependencies: Packages needed only during development, like testing frameworks or build tools. These are not installed in production.
Creating Your First package.json
Creating a package.json file is straightforward. Navigate to your project directory and run:
npm initThis command launches an interactive prompt where you provide information about your project. If you want to skip all prompts and use defaults, use:
npm init -yAfter running this command, you’ll have a basic package.json file ready to customize. Here’s what a simple package.json looks like:
{
  "name": "my-awesome-app",
  "version": "1.0.0",
  "description": "A simple Node.js application",
  "main": "server.js",
  "scripts": {
    "start": "node server.js",
    "dev": "nodemon server.js",
    "test": "jest"
  },
  "keywords": ["nodejs", "javascript", "web-app"],
  "author": "Your Name",
  "license": "MIT",
  "dependencies": {
    "express": "^4.18.2",
    "dotenv": "^16.0.3"
  },
  "devDependencies": {
    "nodemon": "^2.0.20",
    "jest": "^29.0.0"
  }
}
Installing and Managing Dependencies
To add a new package to your project, you use the npm install command. For example, to add the Express web framework:
npm install expressThis command downloads the package from the npm registry and adds it to your **dependencies**in package.json.
Additionally you will also find a new folder added to your node_modules folder which contains all the files related to the dependency you just installed.
If you want to add a development-only dependency (like a testing framework or a logger):
npm install --save-dev loggernautTo remove a dependency:
npm uninstall lodashWhat is package-lock.json?
The Lock File Explained
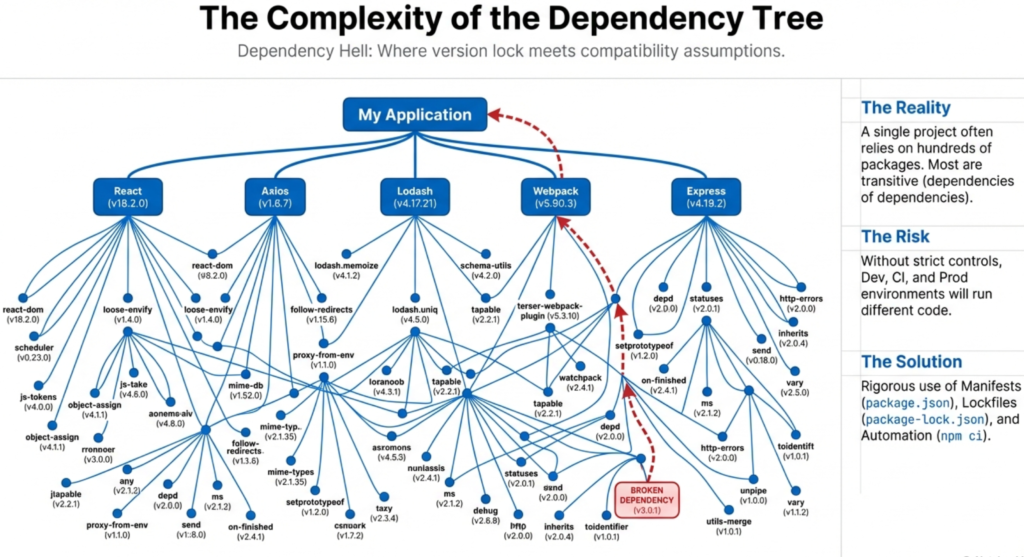
The package-lock.json file will get automatically generated/updated whenever npm modifies the node_modules folder or the package.json file. Its primary purpose is to freeze down the exact versions of all dependencies in your project.
In package.json version ranges have symbols like ^ and ~ which allows a certain extent of flexibility and the package-lock.json file records the exact versions that were installed when the npm install command is run. This ensures that every developer on your team, and every deployment environment, uses the same exact versions of dependencies provided they have the same pakage-lock.json file. This is why it’s a good idea to push the package-lock.json file in your git repository.
This file is crucial for consistency and reproducibility. Without it, different machines might install slightly different versions of packages (especially patch versions), leading to unexpected bugs or missing an unexpected bugs that may be happening in production. This is what prevents the classic problem of “it works on my machine but not in production!” from arising.
Structure of package-lock.json
A package-lock.json file contains detailed information about your entire dependency tree. Here’s a simplified example:
{
  "name": "my-awesome-app",
  "version": "1.0.0",
  "lockfileVersion": 2,
  "requires": true,
  "packages": {
    "": {
      "name": "my-awesome-app",
      "version": "1.0.0",
      "dependencies": {
        "express": "4.18.2"
      }
    },
    "node_modules/express": {
      "version": "4.18.2",
      "resolved": "<https://registry.npmjs.org/express/-/express-4.18.2.tgz>",
      "integrity": "sha512-...",
      "dependencies": {
        "body-parser": "1.20.1",
        "cookie": "0.4.2"
      }
    }
  }
}
Here are the most important and primary fields that you will see in a typical package-lock.json file:
lockfileVersion: Indicates which version of the lock file format is being used. Different npm versions use different formats (version 1, 2, or 3).
requires: A boolean flag indicating whether to read and use the dependency tree.
packages: Contains information about each package in your project dependency tree, including the exact version, download URL, integrity hash, and sub-dependencies.
dependencies: Legacy field that lists direct dependencies and their versions for backward compatibility.
Why package-lock.json is Important
Dependency Reproducibility: Makes sure your project uses exact dependency versions, so you always have the same setup, wherever and whenever you install. This ensures you won’t face unexpected changes or surprises.
Prevents Unexpected Breaking Changes: Lock files also protect you from sudden breaking changes. If you don’t use them, you might get new updates—even bug fixes or minor changes—that could unexpectedly break your code. With a lock file, you have a safety net.
Team Collaboration: Collaborating in a team becomes much simpler, too. Everyone gets the same versions, so you don’t spend hours tracking down differences or asking, “why does it work for you but not for me?”
Continuous Integration (CI) Benefits: In continuous integration pipelines, lock files ensure every build is identical. You always know what’s being deployed to production, every time.
Faster Installations: npm can skip version resolution steps since exact versions are already specified. npm already knows which versions to install, skipping the extra step of figuring out what’s compatible. That means less waiting and more time coding
package.json vs package-lock.json: Key Differences
Here’s a comprehensive comparison for the above explanation:
| Feature | package.json | package-lock.json |
|---|---|---|
| Purpose | Defines project metadata and dependencies. | Locks exact versions of dependencies. |
| Version Specification | Uses version ranges (^1.2.3, ~1.2.3). | Records exact locked versions (1.2.3). |
| Manual Editing | Developers edit directly. | Automatically generated and updated. |
| Flexibility | Allows version flexibility for updates. | Zero flexibility—exact versions only. |
| File Size | Small and human-readable. | Large (includes entire dependency tree). |
| Version Control | Should be committed. | Should be committed. |
| Primary Audience | Developers. | npm and CI/CD systems. |
| Lock Guarantee | Partial (only direct dependencies). | Complete (entire dependency tree). |
Semantic Versioning: Caret (^) and Tilde (~)
Understanding Version Ranges
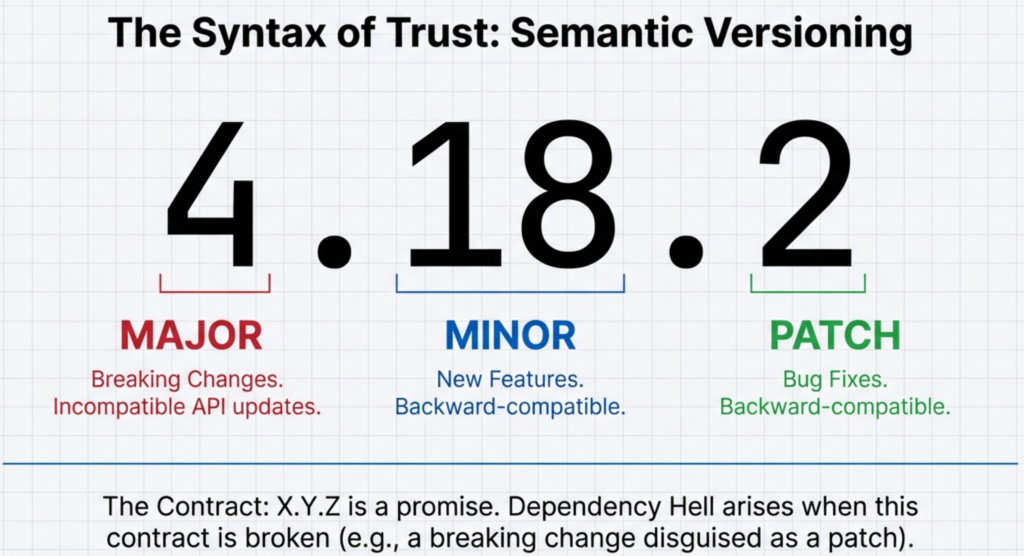
One of the most important thing in package management is to understand semantic versioning (often called “semver”). This system uses three numbers in the format MAJOR.MINOR.PATCH (e.g., 4.18.2), where:
- MAJOR version increases when you make incompatible, breaking changes in accordance with the previous versions.
- MINOR version increases when you add new features that are backward compatible.
- PATCH version increases when you fix bugs in a backward compatible manner.
In your package.json, you may see two symbols before version numbers: the caret (^) and the tilde (~). These symbols instruct the package manager npm which types of updates are safe to install.

Tilde (~): Patch Version Updates
The tilde symbol instructs npm to install only patch versions. This is the most conservative and safe approach.
If you have mentioned "express": "~4.18.2", in the absence of package-lock.json file npm can install any patch version of 4.18.x, such as 4.18.3, 4.18.4, or 4.18.5.
It will NOT install 4.19.0 or any 5.x version.
text~4.18.2  →  Allows: 4.18.2, 4.18.3, 4.18.4, 4.18.5...
		Blocks: 4.19.0, 5.0.0
When to use tilde: When you want the most stability in your code and trust the package publisher that their patch updates won’t break your code (which they shouldn’t, according to semantic versioning).
Caret (^): Minor and Patch Updates
The caret symbol is more flexible and is considered a default in npm. It allows updates for both minor and patch versions, but NOT major versions.
If you have mentioned "express": "^4.18.2", in the absence of package-lock.json file npm can install 4.18.2, 4.18.3, 4.19.0, 4.20.0, or any other 4.x.x version. However, it will NOT install 5.0.0.
text^4.18.2  →  Allows: 4.18.2, 4.18.3, 4.19.0, 4.20.0, 4.99.0...
		Blocks: 5.0.0
When to use caret: When you want the new features and bug fixes of a particular dependency package but want to avoid major version changes that might break your code.
Special Rules for 0.x.x Versions
Packages with versions below 1.0.0 are considered unstable, these are usually new packages that may just have been published. The rules slightly change for such packages.
For ^0.2.5, the caret behaves like a tilde—it only allows patch updates.
text^0.2.5   →  Allows: 0.2.5, 0.2.6, 0.2.7...
		Blocks: 0.3.0, 1.0.0
npm install vs npm ci: When to Use Each
npm install: Development Workflow
npm install (short version: npm i) is the command you would want to use during development.
This command:
- Installs new dependencies listed in
package.json. - Update existing dependencies to compatible newer versions.
- Create or update
package-lock.jsonif dependencies have changed. - Allow partial installations (you can install just one package).
npm install loggernaut
OR
npm i loggernaut
OR
npm install --save-dev loggernaut
OR
npm i -D loggernaut
The command is optimized primarily for development flexibility than strict reproducibility.
npm ci: Continuous Integration Environment
npm ci stands for “clean install” and was introduced in npm version 5.7.0.
It was specifically designed for the use in automated environments like CI/CD pipelines, deployment servers, and testing environments.
This command:
- Requires a
package-lock.jsonfile (Command will fail without it). - Installs exact versions from
package-lock.json—without modifying anything. - Deletes and recreates the entire
node_modulesdirectory. - Is faster than
npm install. - Throws an error if there are any mismatch of the package versions between the files
package.jsonandpackage-lock.json - Is more reliable and deterministic and thus is adviced to use in the production environment application boot process.
npm ciKey Differences Summary
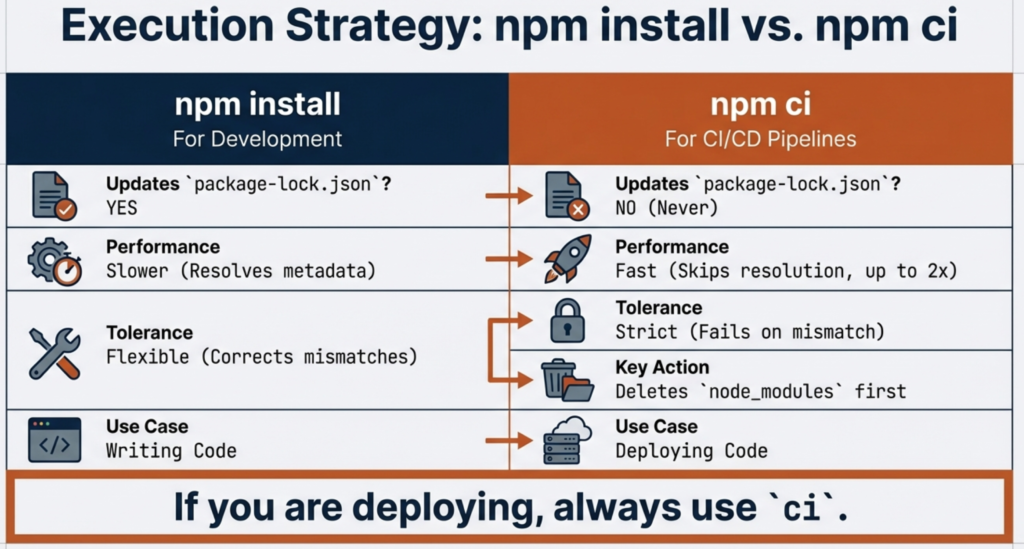
| Aspect | npm install | npm ci |
|---|---|---|
| Purpose | Development. | Continuous Integration / Deployment. |
| Requires package-lock.json | No. | Yes (fails without it). |
| Modifies lock file | Yes (may update it). | No (read-only). |
| Speed | Standard. | Faster. |
| Full project install | Optional (can also add single or selected packages). | Required (installs entire project). |
| Error on mismatch | Fixes automatically. | Fails with error message. |
Best Practices
In development: Always use npm install to manage your dependencies flexibly.
In CI/CD pipelines: Use npm ci to ensure fast, reliable, and reproducible builds.
In Docker containers and deployment: Use npm ci to guarantee the exact same dependencies every time.
Here’s a typical Dockerfile pattern:
FROM node:18-alpine
WORKDIR /app
COPY package.json package-lock.json ./
RUN npm ci --only=production
COPY . .
CMD ["node", "server.js"]

/* Command Explanation:
* Sets the base image as Node.js version 18 on an Alpine Linux distribution for smaller size.
* Sets the working directory inside the container to /app.
* Copies package.json and package-lock.json from the local filesystem to the working directory in the container.
* Installs the project's dependencies specified in package-lock.json for production use, ensuring a clean install.
* Copies all remaining files from the local directory to the current working directory in the container.
* Specifies the command to run the application using Node.js to start server.js.
*/
Practical Examples and Terminal Commands
Setting Up a New Project
Create a new project directory and initialize npm:
mkdir my-web-app
cd my-web-app
npm init -y
This creates a basic package.json and it now contains these dependencies, and a package-lock.json file has also been generated.
Adding and Updating Dependencies
- To add/install a package:
npm install loggernaut
OR
npm i loggernaut- To add/install a package as development dependency:
npm install --save-dev loggernaut
OR
npm i -D loggernaut- To add a specific version of a package:
npm install loggernaut@1.2.1- To update all dependencies to their latest compatible versions:
npm update- To update a specific package:
npm update loggernautChecking Installed Packages
- To view your installed dependencies and their versions:
npm list
OR
npm list --depth=0 # Only shows direct dependencies- To view outdated packages:
npm outdatedRemoving Dependencies
- To remove a package:
npm uninstall loggernaut
OR
npm rm loggernaut
Working with package-lock.json
- If you accidentally delete
package-lock.json, regenerate it:
npm install --package-lock-only- To force updating the lock file without installing dependencies:
npm i --package-lock-onlySecurity Auditing
- Check your dependencies for known vulnerabilities:
npm audit- Automatically fix vulnerabilities where possible:
npm audit fixBest Practices for package.json and package-lock.json
1. Always Commit package-lock.json
Always include package-lock.json in your version control system (Git). This ensures all team members and deployment environments use the same exact versions.
# In your .gitignore, make sure package-lock.json is **NOT** ignored
# Leave this line commented or remove it if it exists:
# package-lock.json
2. Use Semantic Versioning Wisely
For public packages, follow semantic versioning strictly. For private applications, caret (^) is usually the right choice as it balances safety with access to bug fixes.
{
  "dependencies": {
    "express": "^4.18.2",        // Allow minor updates
    "lodash": "~4.17.21",        // Patch updates only for stability
    "critical-lib": "1.0.0"      // Exact version for critical packages
  }
}
3. Regularly Audit Dependencies
Use npm audit to identify security vulnerabilities and keep dependencies up to date.
# Weekly or monthly security checks
npm audit
npm audit fix
4. Clean Up Unused Dependencies
Regularly remove dependencies your project no longer uses. Many projects accumulate unused dependencies over time.
npm prune # Removes packages not listed in package.json5. Use npm ci in CI/CD Pipelines
Always use npm ci instead of npm install in automated environments to ensure reproducible builds.
# Example GitHub Actions workflow
name: CI
on: [push]
jobs:
  build:
    runs-on: ubuntu-latest
    steps:
      - uses: actions/checkout@v2
      - uses: actions/setup-node@v2
      - run: npm ci
      - run: npm test
      - run: npm run build
6. Document Dependencies in package.json
Add meaningful keywords, description, and repository information to help other developers understand your project:
{
  "name": "express-api",
  "version": "1.0.0",
  "description": "RESTful API built with Express.js",
  "keywords": ["api", "rest", "nodejs", "express"],
  "repository": "<https://github.com/yourname/express-api>",
  "bugs": "<https://github.com/yourname/express-api/issues>",
  "homepage": "<https://github.com/yourname/express-api#readme>"
}
7. Manage Dev and Production Dependencies Separately
Keep development tools separate from production dependencies to reduce bundle size:
{
  "dependencies": {
    "express": "^4.18.2",
    "cors": "^2.8.5"
  },
  "devDependencies": {
    "jest": "^29.0.0",
    "nodemon": "^2.0.20",
    "eslint": "^8.25.0"
  }
}
8. Lock Specific Versions for Critical Dependencies
For libraries that directly impact security or stability, consider using exact versions:
{
  "dependencies": {
    "bcryptjs": "2.4.3",          // Security critical - exact version
    "express": "^4.18.2",        // Application framework - minor updates ok
    "dotenv": "^16.0.3"          // Configuration - minor updates ok
  }
}
Conclusion
If you’re working with Node.js, you can’t ignore package.json and package-lock.json. These two files shape how your project runs, how your team works together, and even how smooth your deployments go.
Here’s what matters:
package.json lists your project’s dependencies. It uses symbols like ^ and ~ for version ranges, so you get a bit of flexibility—updates, but under control.
package-lock.json, on the other hand, nails down the exact versions. This means if you—or anyone else—install dependencies, you all end up with the same versions. No surprises, no “but it worked on my machine” headaches.
During development, stick with npm install. It keeps things flexible. When you’re running builds or tests in CI/CD pipelines, though, switch to npm ci. It’s faster and locks in versions, so you know exactly what’s getting installed.
Commit package-lock.json to your repo. Seriously. It keeps everyone on the same page, every time.
A few more tips: run npm audit to catch security issues, keep dev dependencies separate, and document your project—it saves time for everyone.
Get comfortable with these two files and you’ll sidestep a lot of pain. Clean dependency management isn’t just for big projects. Whether you’re hacking on a side project or shipping code in production, package.json and package-lock.json are the backbone of reliable Node.js development.
Additional Resources
Here are valuable external resources to deepen your understanding:
Official npm Documentation
Security and Best Practices
Semantic Versioning
Continuous Integration and Deployment
Community Resources